What the Fox?
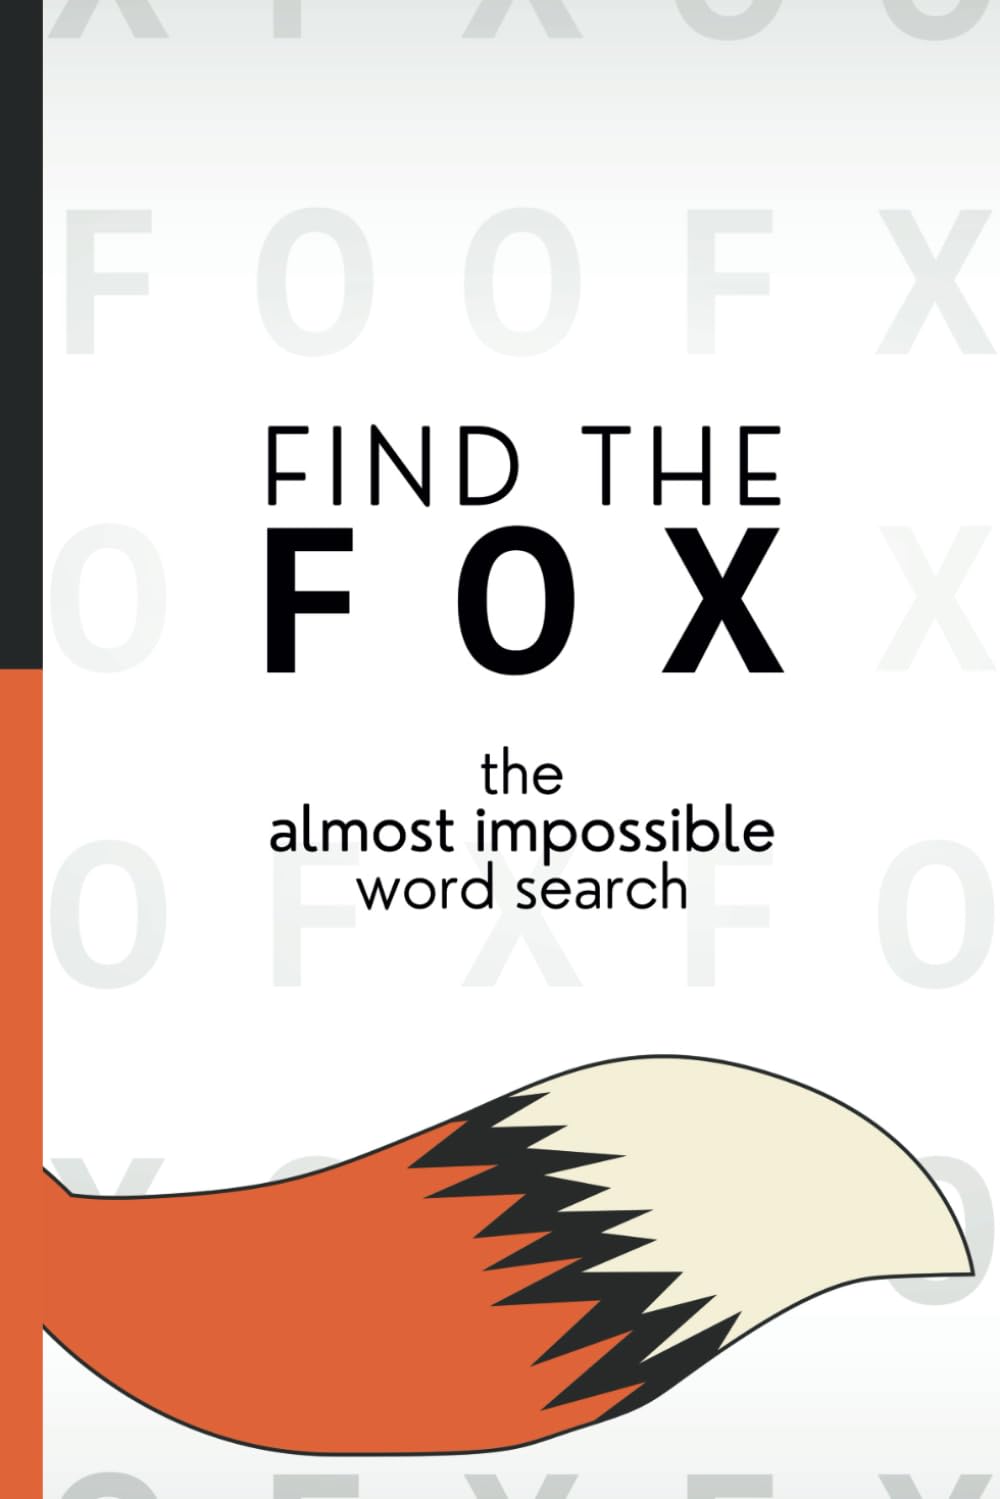
For those of you who have not heard of it, let me be the one to introduce you to the amazing book 'Find The Fox', by Alex Cheddar. Its basically a 200 page word search where in all the pages, there is only ONE 3 letter word to find haha. Alex describes the hunt as 'finding a needle in a haystack, if the haystack was made entirely of needles.' and I couldn't think of a more apt description.
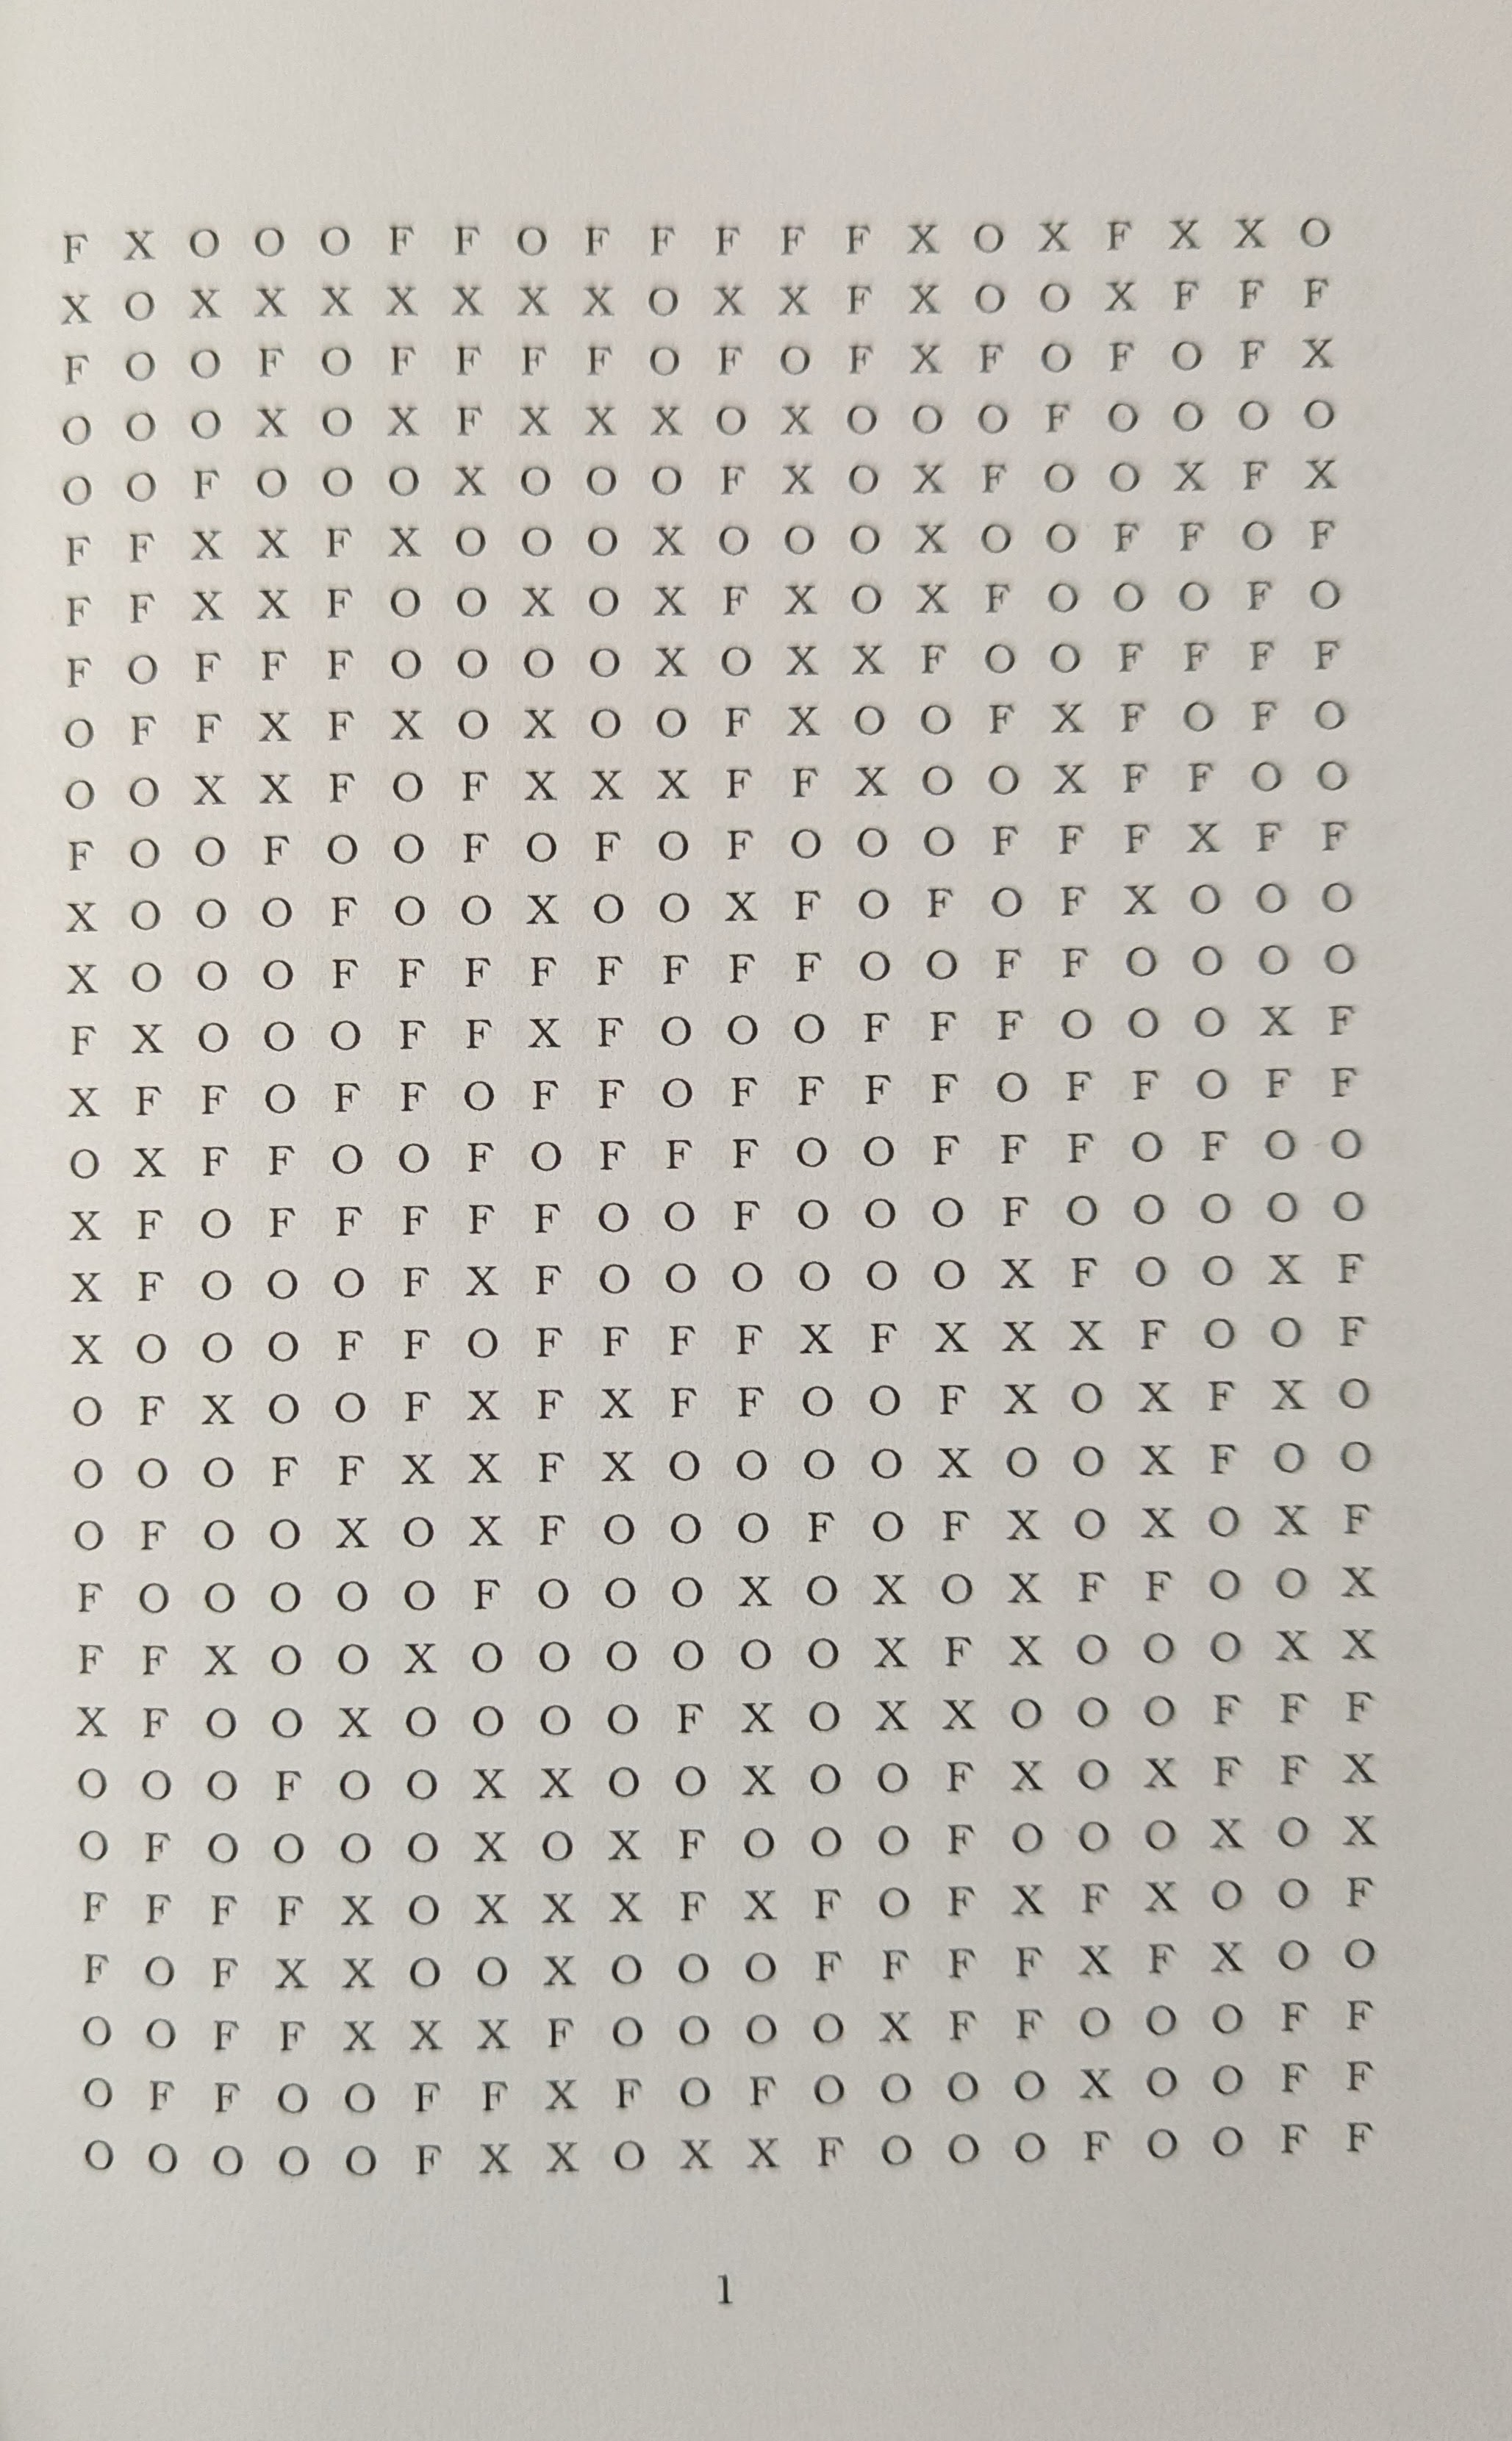
Trying to solve it manually page by page could literally drive you crazy (try looking at page one for yourself!). You need to be meticulous with every line as a single slip and you could end up reaching the final page without finding the fox.
Solving the ‘Find the Fox’ Puzzle
Sooooo…… Obviously there’s got to be a better way right? Programatically it is quite easy to go through text grids. Basically in a 2d array, you can loop through each point and check the letters in all 8 directions for the word fox. The main challenge here is to get that digital grid, ie, to convert the physical pages in my hand to a 2d digital grid per page and then search for the work fox in each.
TL;DR
I used OpenCV and a classification network to go through every page of the “Find the Fox” puzzle book to solve the puzzle! Here’s how I processed each image, detected the grid, extracted letters, and matched patterns using Python. Let’s begin!
PS: If you want to go straight to the solution, jump right over here.
OCR with Pytesseract
We can use OCR to extract the text from the page to digital strings. There are already inbuilt python libraries such as pytesseract that have trained OCR models that can be used.
Using that I could convert an image of the page into text strings. Prior to the digital scanning, we also need to preprocess the image in order to rempve any shading issues or shadows and make the letters more clear. In order to preprocess the image I used 3 steps:
- Grayscale: Convert the image from RGB to Grayscale. In our case we have images of the page and we only want the words which are basically black on white. By converting the image to Grayscale, we can remove all the color and ensure the image has only 1 channel.
- Threshold: Apply a mask to make the image into binary segments - character or not. By using the cv2 'threshold' method, we can set every pixel to either 0 or 255 based on a given threshold value.
- Dilation: Based on the photo, the lighting and the threshold value, the characters can get pixelated. Using the 'dilate' method from cv2, we can smooth out the image to make the characters more recognizable.
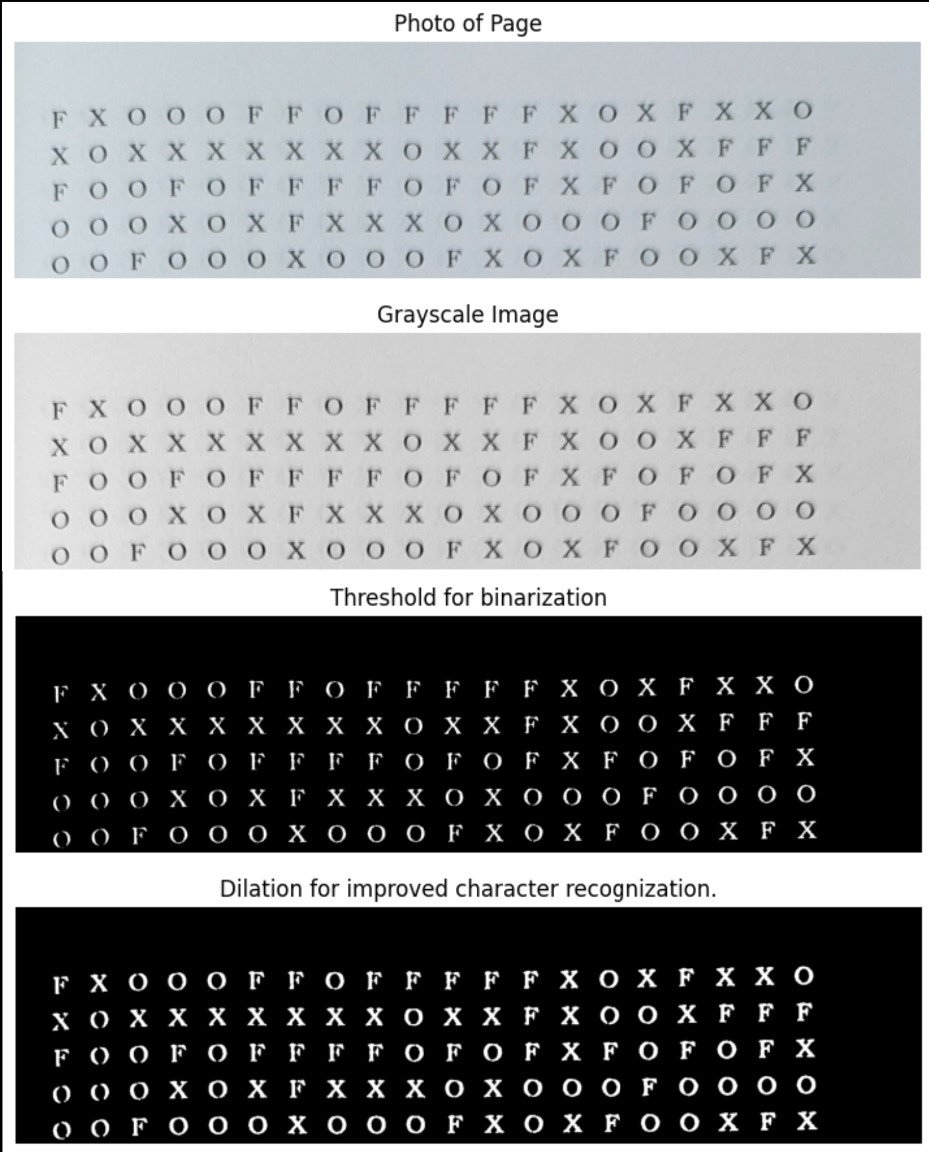
Post the preprocessing, we can pass the image through pytesseract to extract the characters. To do this we can use the ‘image_to_string’ method in pytesseract to get the string. Tesseract also has multiple page segmentation modes when identifying text, ranging from psm 3 (default) to psm 6 (assume single uniform block of text) to psm 11 (sparse text, find in any order). However the results were not ideal. For example this was the string extracted from the above image:
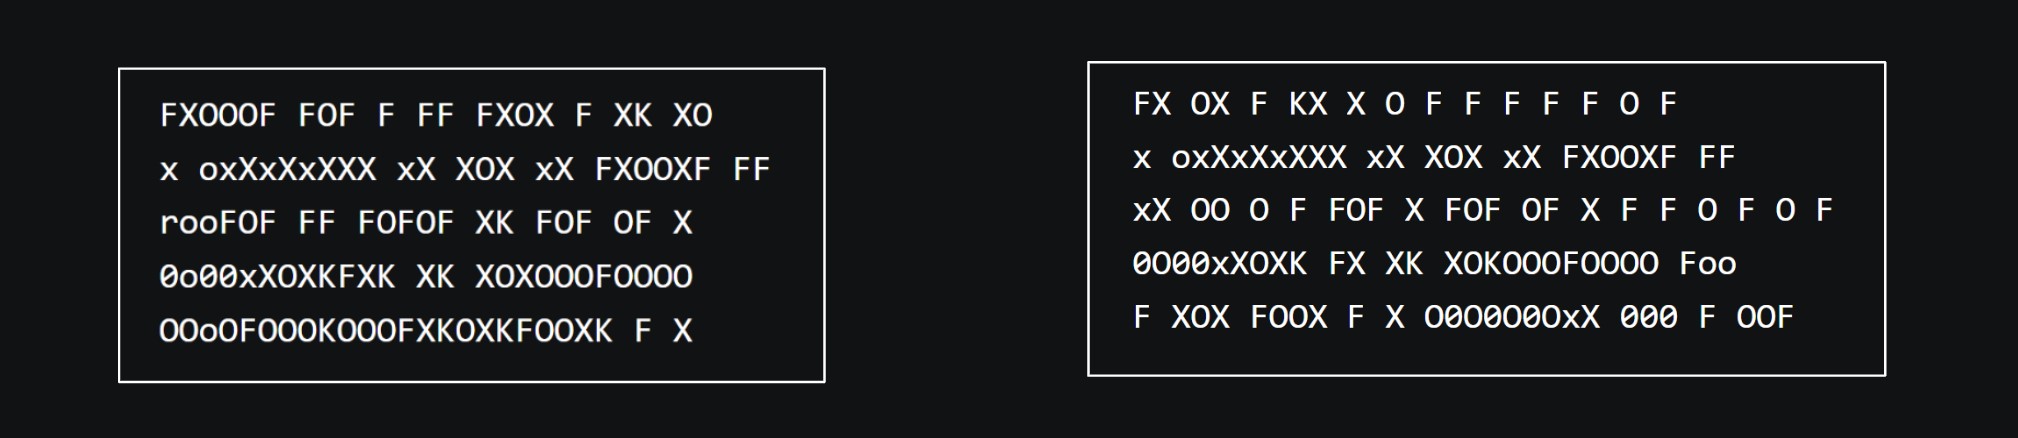
There are multiple issues with this. Firstly we dont get 20 characters per line. Secondly we get letters that are not F O or X such as 0 or K or r. Pytesseract also has another method called ‘image_to_data’ which extracts the bounding boxes as well as the corresponding string. Plotting the bounding boxes on the image we can get an idea of what is happening behind to scenes to understand our problem elements.
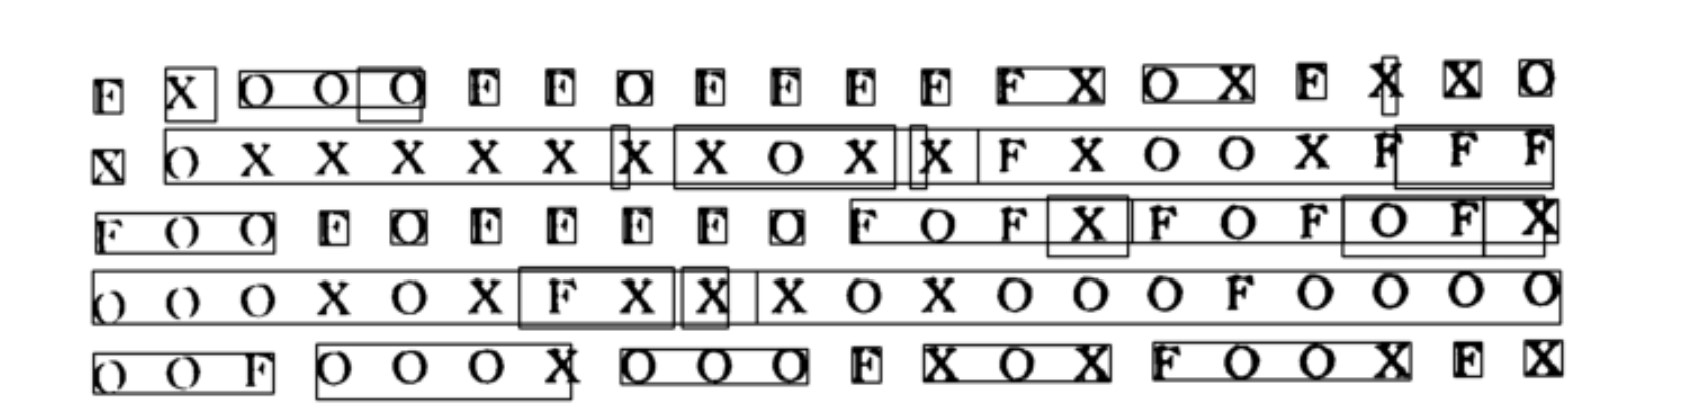
Looking at the boxes we can see that the OCR extraction had a lot of issues. There were multiple overlapping bounding boxes leading to additional letters being extracted. Also certain boxes only covered parts of the letters leading to it detecting letters like ‘K’ from parts of the X. And these were issues with 5 lines from a single page. Learning how Tessarct was identifying characters and understanding how to preprocess the image such that it could extract all the letters properly without errors seemed like it would take a lot more challenging.
I needed a different method with better control in order to solve this.
Manual Extraction and Classification
To have slightly better control of the character recognition, I knew I did not want to pass the entire page or an entire line to Tesseract. Instead the next option would be to manually classify this. I knew it would be very easy to write a simple CNN to classify the characters into F or O or X (a multi class classification problem). The only thing would be to extract the letters out individually.
We can break the problem into four steps:
- Extract Characters: Need a way to extract individual characters from the page. There are 32 rows of 20 characters each, so 640 characters per page.
- Order Characters: Having 640 characters is good, but I needed to maintain the order they were extracted on the page.
- Classify Characters: Classify each character into F, O or X and generate a 2d array of these characters.
- Array Search: Iterate through the array to find an occurence of the word 'FOX' in any of the 8 possible directions.
Extract Characters
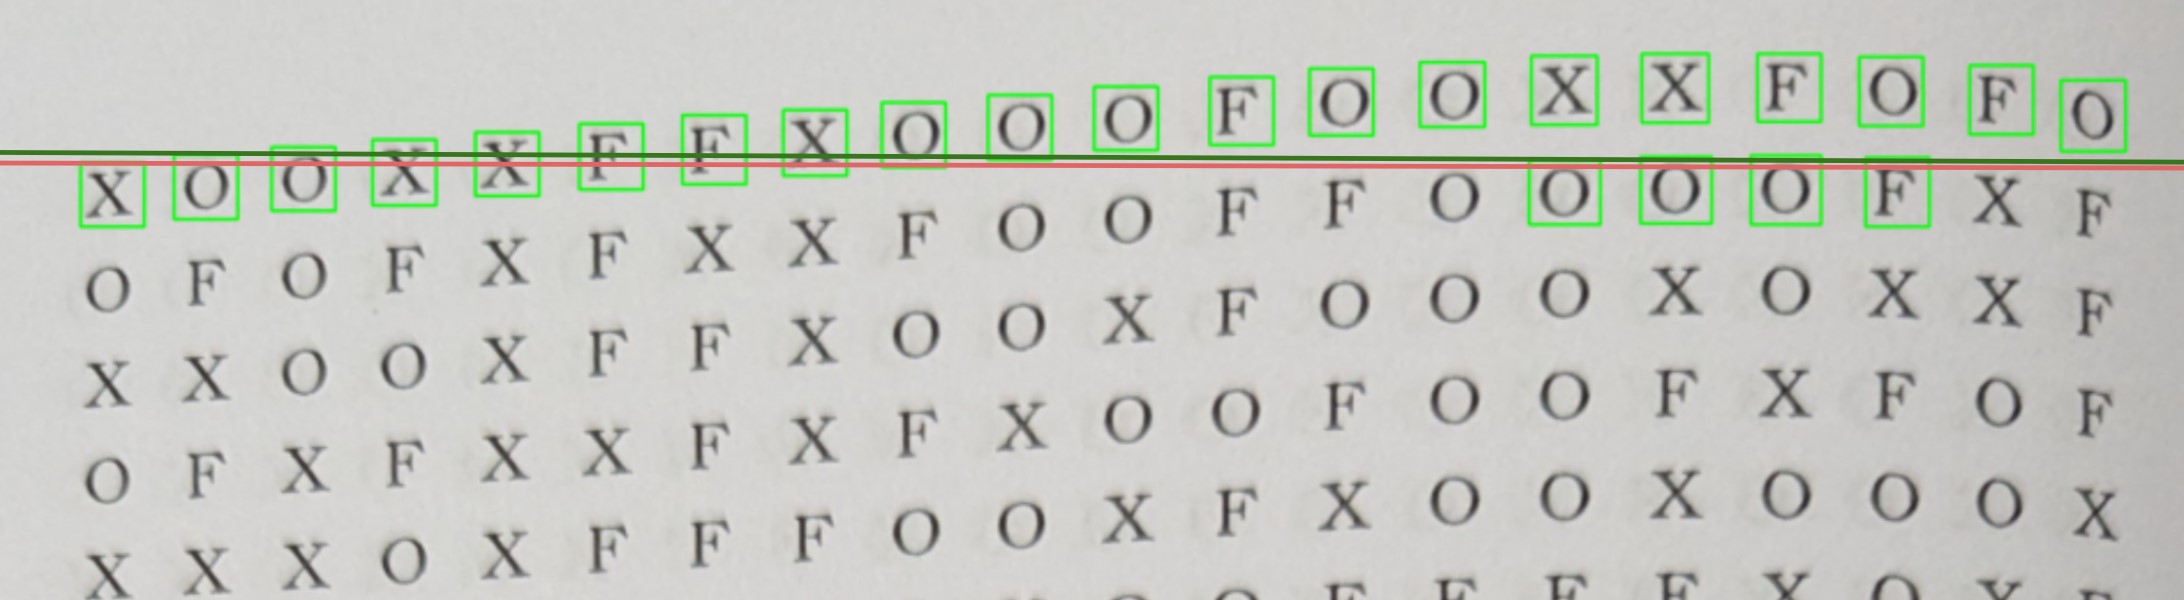
To do this, I used CV2 to extract the contours from the page. Now due to the picture quality (natural light and shading when taking the picture) and preprocessing (mainly thresholding), a lot of contours (around a 1000) would be extracted per image.

Using the ‘boundingRect’ function in cv2, we can extract a bounding box for the contours. Looking at the extracted contours above, we see that since the thresholding is high, we end up breaking up some characters into multiple contours. However reducing the threshold value introduces a lot of noise into the image which we want to avoid. Hence I needed a couple of ways to fix this.
Sometimes some noisy parts would also be detected. To handle this, I removed any bounding boxes that were too close to the page edges (x or y co-ord very close to 0 or page limits) or contours that had a very small area. To get the area for the contours, I used cv2's 'contourArea' function.
Merging Contour Bounding Boxes:
What I wanted was a single bounding box per character. However for example, since the thin part between the sides of an O got split into two, I would end up with two contours close together, each containing part of the O. To fix this I used a function to merge the bounding boxes of contours that were close together. After extracting all bounding boxes from each contour, I would check the distance of it (its x,y co-ords) to other boxes. If this value was below a given threshold (I set it to 50), I would remove it. Usually it was noise, but in case it was part of a letter, then it was small enough that the classifier should still be able to identify the character.
With these two steps, I was able to get the bounding boxes of all 640 characters quite clearly more often than not. I normally would get more than 640 (a couple more boxes for the page number at the bottom) but I would take only the first 640 boxes.

Order Characters
Using the above I was able to get 640 character boxes (each defined by an x,y along with a height and width). However I needed to arrange them in the correct order as on the page so that I could recreate the grid exactly.
Sorting:
My first idea was to sort the boxes according to their x and y co-ordinates. I tried sorting the array using the sorting order as ‘box: box.y * img_width + box.x’. This should have sorted the boxes from top left to bottom right. However since the contour detection would give different boxes, the same row could have boxes with positions A-(10,20), B-(80,21), C-(150,19) and so on. So even though it should be in the order A,B,C based on the x co-ord, since the y co-ord of C is less than A, the sorted order ends up being C,A,B.
2 Step Sorting:
To try and fix that I tried a 2 step sorting process. First I would sort it all by y co-ords. Then since I knew the first 20 boxes would belong to the first row and ideally should ahve similar y values (within a small range) while the second row should have y-values much greater than the first row. Hence after my first sort, I could then take each set of 20 boxes and sort them as they ideally should be in the same row.
This too failed on some special cases. Since the images I took were not perfect, it was possible for the page to be curved and hence it was possible that some boxes in the 2nd row could have smaller y values than boxes in the first row. Same for the columns.
Special Sorting:
I knew I would have to do something different. Hence I built my own sorting based on the fact that boxes in a given row would always have an x value higher than its previous neighbour, and would be the closest ‘unseen / unmarked’ box to its neighbour.
I kept a list of all boxes I had already sorted (initially an empty list). First (Step i) I found the top leftmost box. This could be done by taking the first 25 boxes with the lowest y value that have not been seen yet, and then out of them find the box with the lowest x co-ordinate.
Adding it to the list, I iterated through the remaining boxes to find the next box, i.e, the one that had a greater x co-ord value, had a y-cord value within a limit to the current box and then had the shortest distance. After finding 20 such ‘next’ boxes I knew I had a row, and would start again Step ‘i’ to find the next row.
Not the cleanest code, but gets the job done very well :)
Character Classification
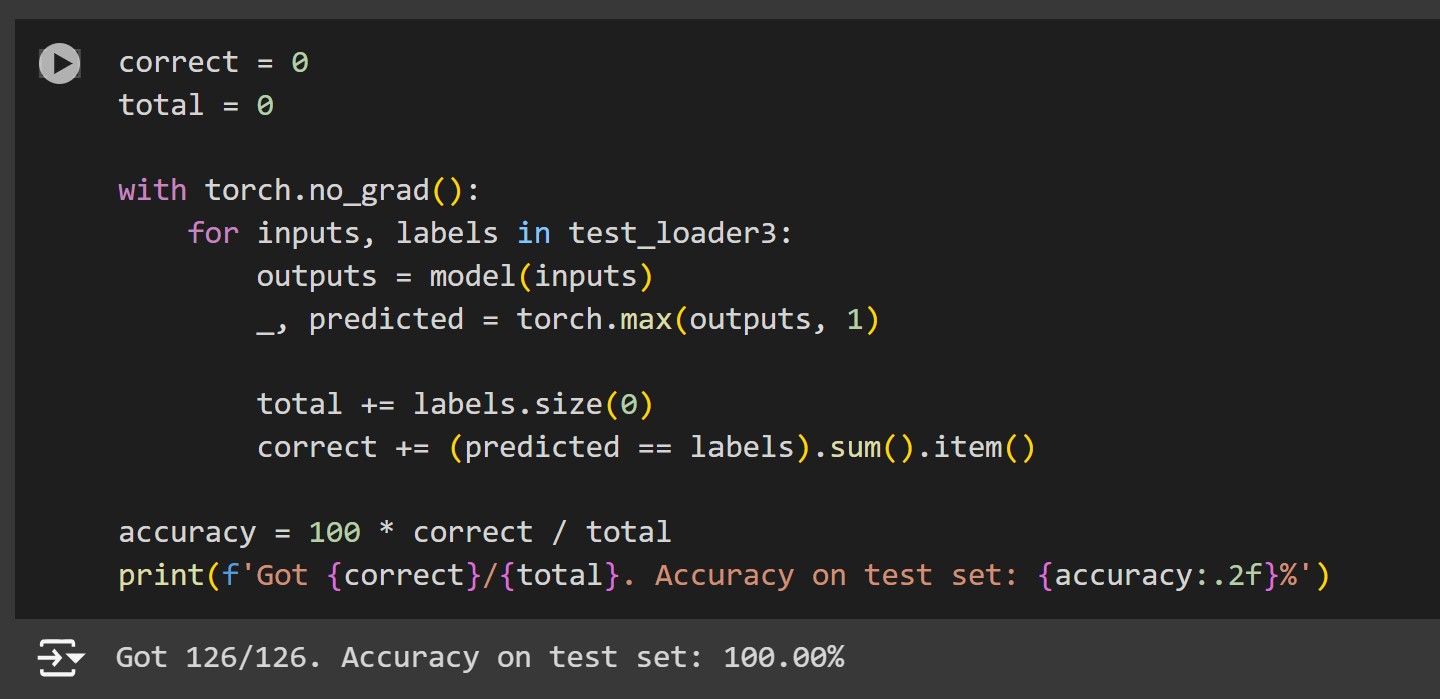
Now that I could extract the characters, I needed to be able to classify each of these characters into the letter F, O or X. To do this, I used an simple CNN that I trained using Supervised learning.
First I took part of a page and extracted all the characters, resized them to 64x64 and saved them to a directory. I then created a CSV file to label each of the images. Creating a custom dataset, I was able to load the data using Pytorch’s Dataset and DataLoader, which I then divided 80/20% into train and test sets.
I used a simple CNN with 2 convolution layers (along with max pooling and activation) followed by 2 linear layers that overall converted a 1x64x64 image into a 1x3 output which was the logits for each of the classes - ‘F’, ‘O’ or ‘X’.
Training the model over a few epochs, I was able to achieve a 0 loss and a 100% accuracy on the test set. However while testing I realized that some broken Fs were being classified as Os. I enhanced the training dataset by doing the same with a full page (640 characters) and retrained the model and was able to correctly classify all the characters.
Grid Search
Given the previous steps, we now have a 2d array representing a page. We just need to loop through the array, and given any ‘F’, search its neighbours in all 8 directions for the letters O and X in that sequence. If we do, we have a hit, otherwise continue the loop.
Final Solution
After running this on a lot of pages, I finally got a hit on the fox!! Here is the solution along with hints in case you want to try and solve it manually.
Spoiler Alert: Hint 1 - Which quarter of the book
The FOX is found somewhere in the last quarter of the book, i.e. in pages 150 - 201.Spoiler Alert: Hint 2 - Orientation
The FOX is found in a vertical alignment with F on top and O below that with X below that.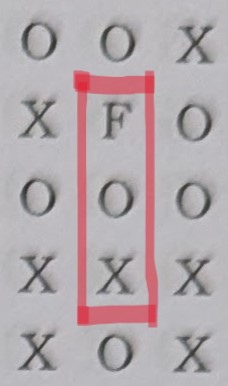
Spoiler Alert: Find the Fox Solution
Are you sure you want to see the solution? Theres no turning back!
The FOX is found in page 157!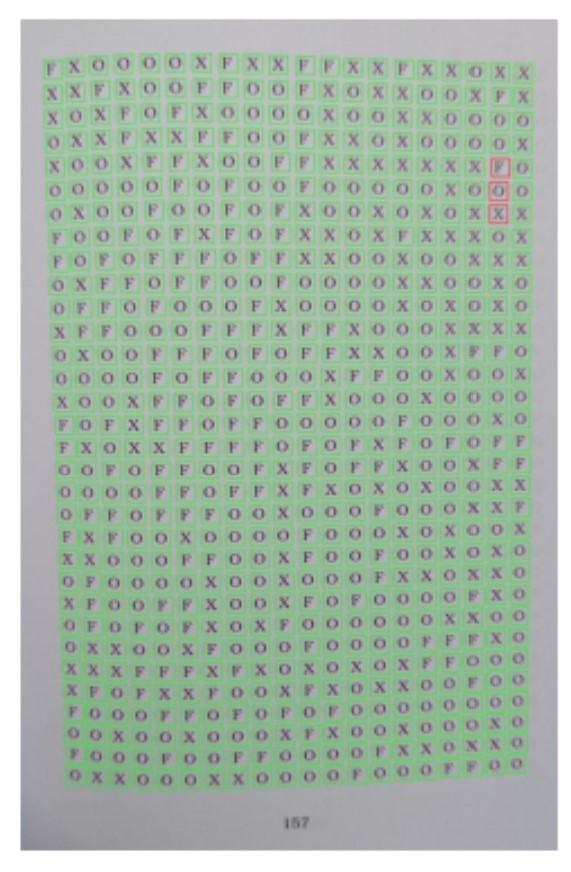
This was a fun challenge that combined OCR, computer vision, and nueral networks. If you’re trying to solve the “Find the Fox” book and want to build your own image-based solver you can purchase the book here, or reach out for the dataset I used. Hope you had fun reading this!
Signing out.